Unreal Engine
Art Tooling
Aura’s art tools are designed for rapid prototyping. They help you explore visual ideas, create references, and quickly test concepts all directly inside Unreal.
💡 Art tools can take a few minutes to run, remember you can work in multiple chat threads at the same time (up to ~4)!
To use the tools below, make sure you’re in Agent mode first.
Image Generation
Aura can help explore visual concepts, create tiling textures, and create reference images based on text descriptions. Reference images can also improve results when generating 3D models.
Examples
-
“Create an icon image for a ring of dexterity that has a green gemstone.”
-
“Create a seamless tiling texture of a stylized cartoon stone wall.”
-
“Create 3 image variations of a supernatural shadow entity enemy. They should be on a white background too”
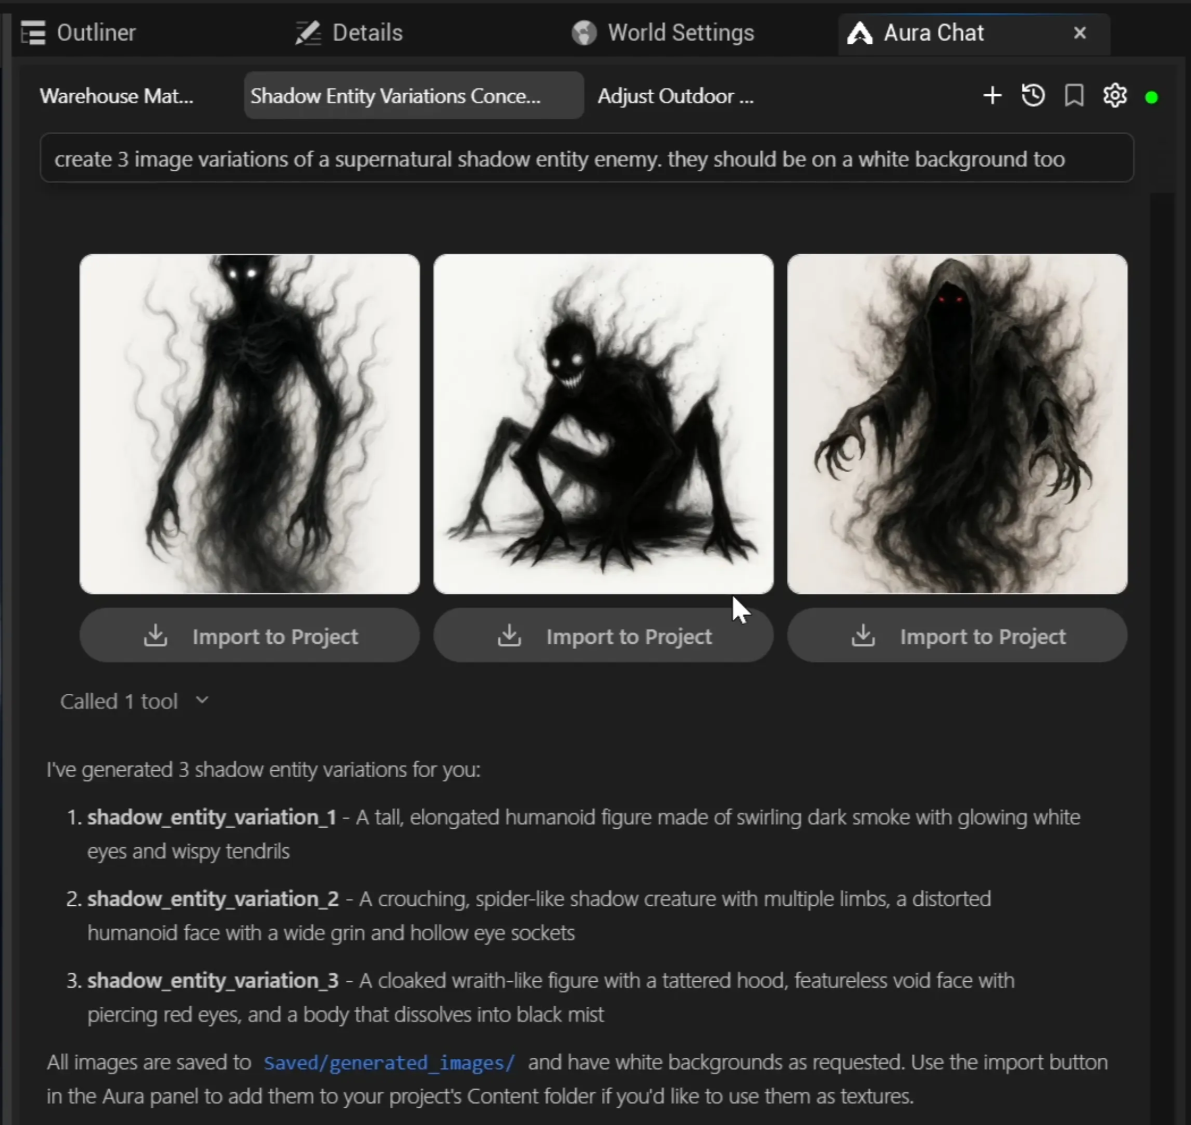
Images are generated at a high quality resolution. You can specifically ask Aura for a “low resolution” image which will speed up generation time. Generated images appear as thumbnails in chat. Click any thumbnail for a fullscreen view.
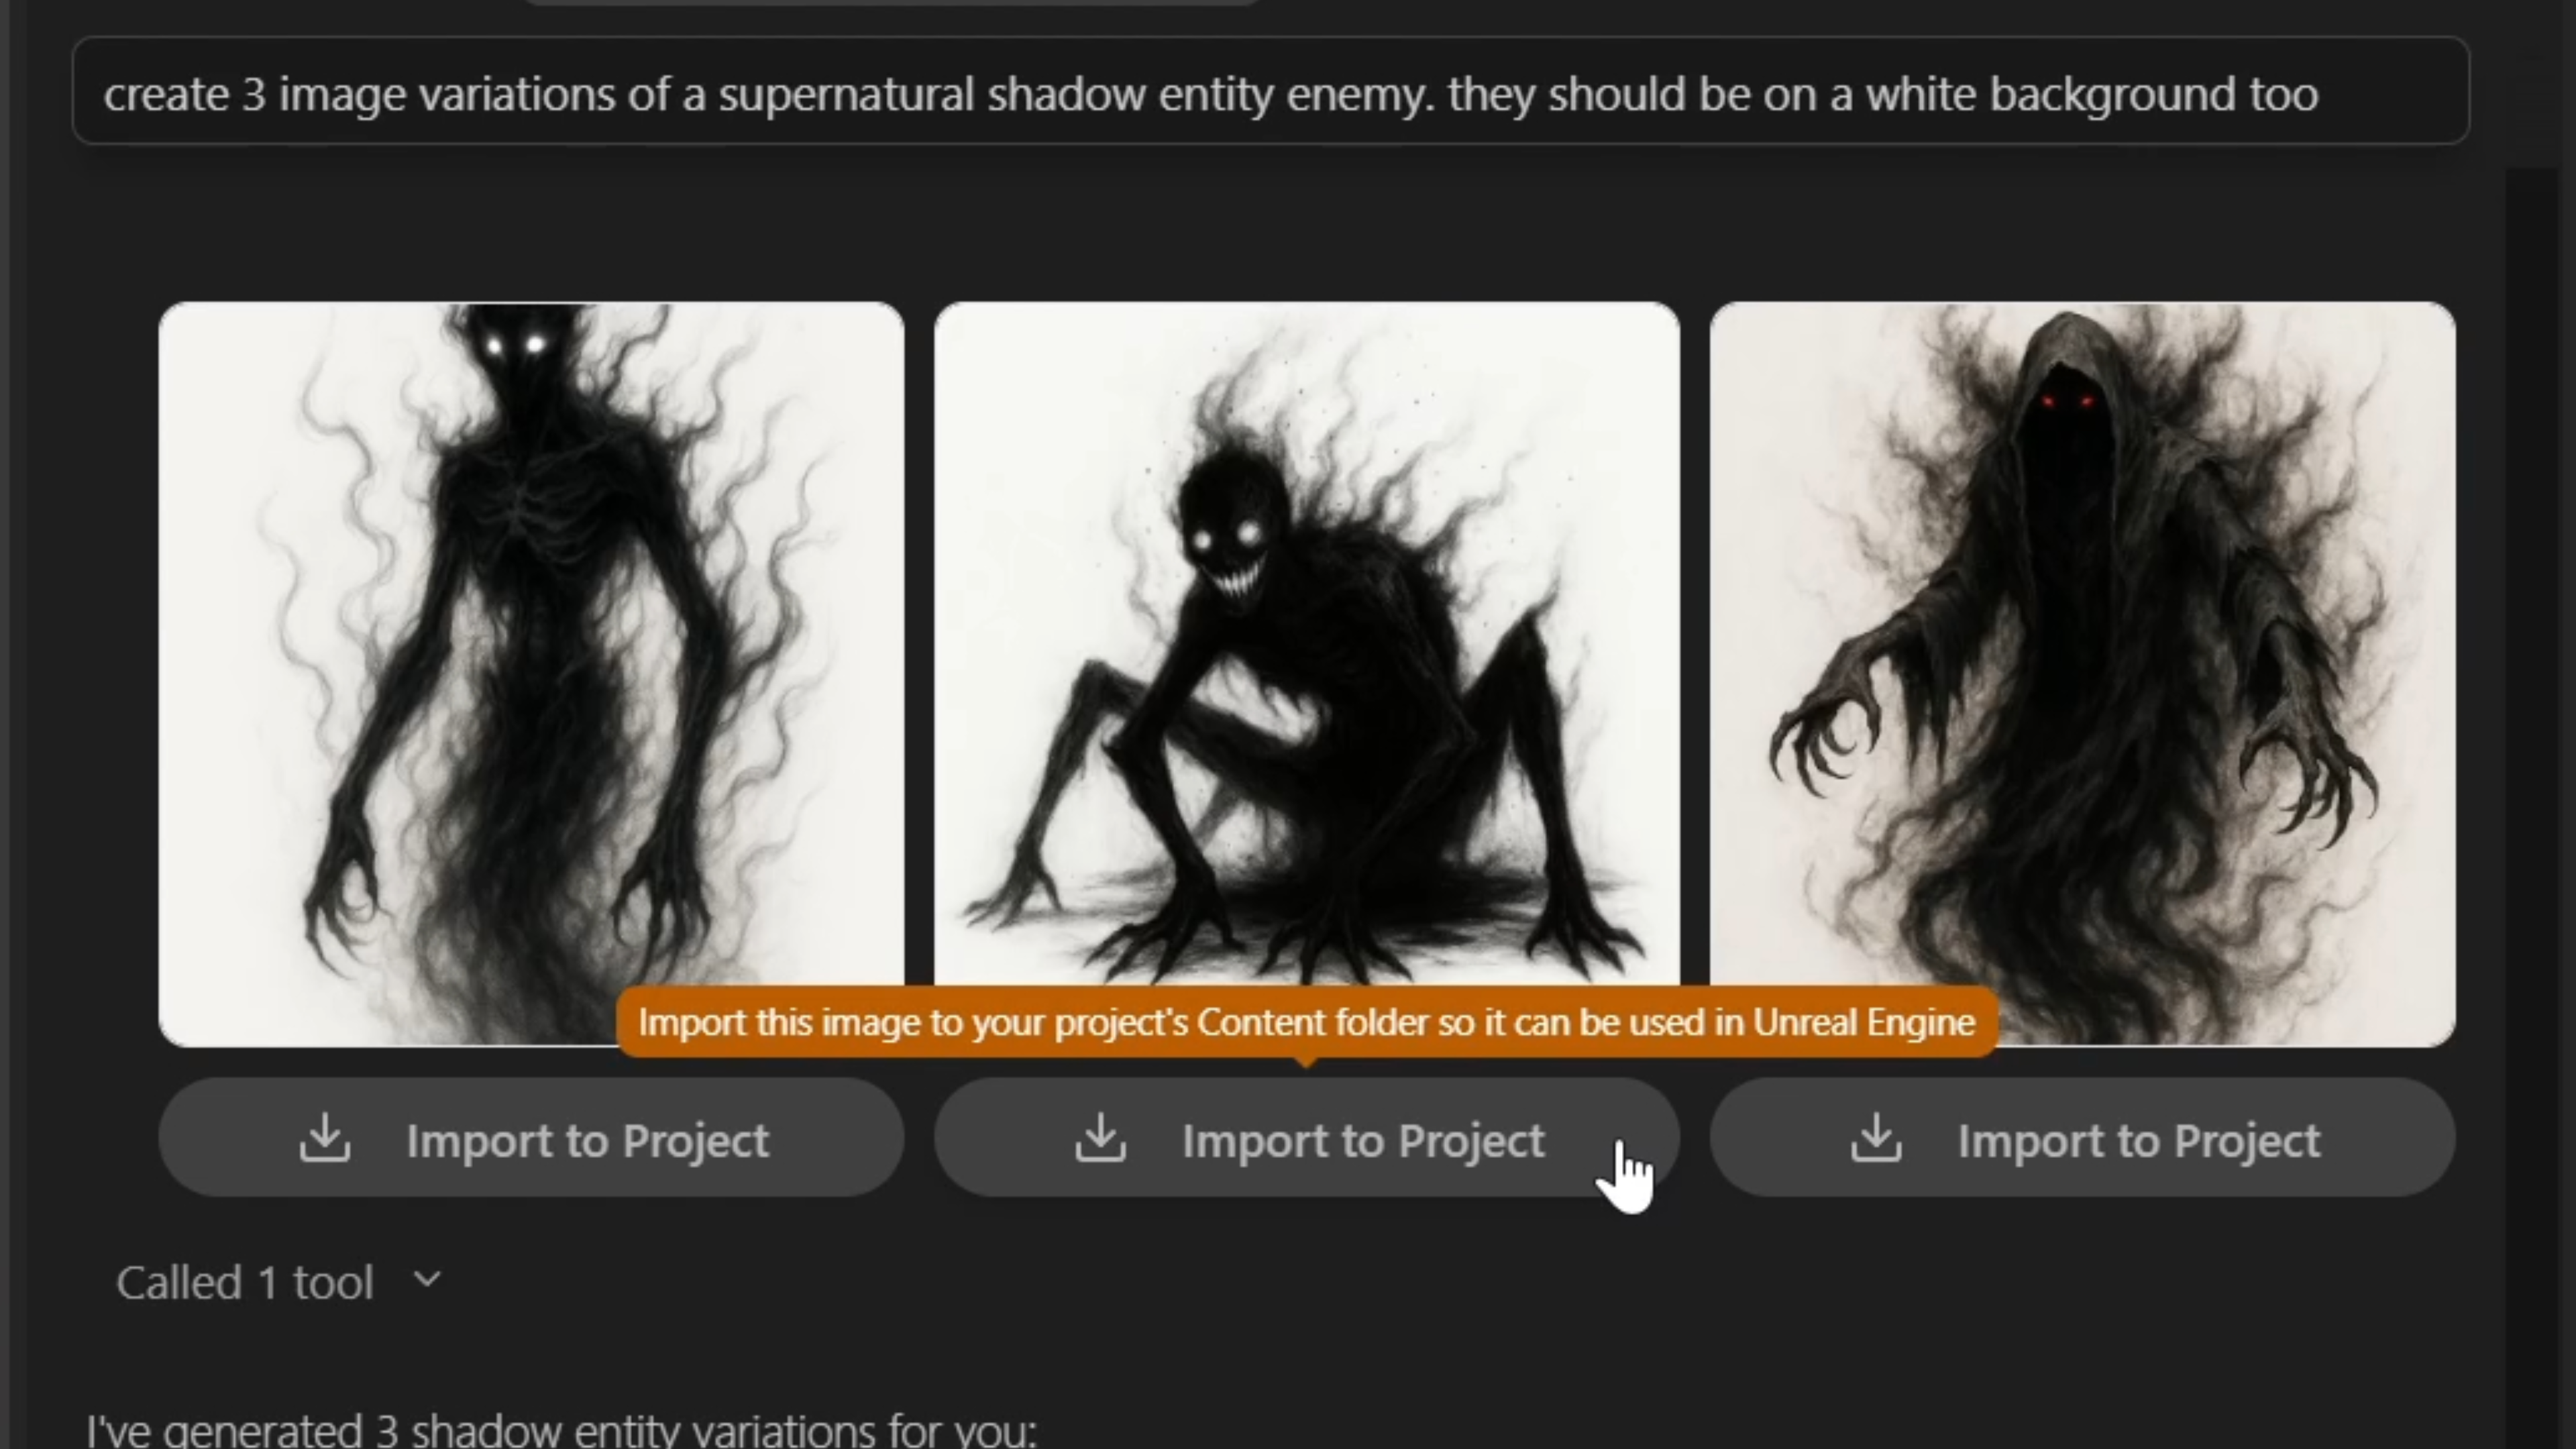
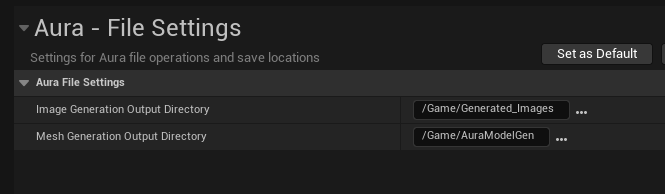
If you’re happy with an image you can save it by clicking the Import button. By default images are saved in Content/Generated_Images/. You can customize the save folder in Editor Preferences (see Additional Settings).
Note: Un-imported image generations are not lost/discarded. You can find them in {ProjectFolder}/Saved/generated_images
Image Editing
You can iterate on an image with Aura by describing changes you’d like to make. Aura will create a new copy of the image with the requested edits.
💡 Since Aura is aware of all the images in a thread, when editing an image in a thread with many images, it’s useful to tell Aura specifically which image it should edit. i.e. “Edit the image of the dog wearing a tophat by adding a monocle and a bowtie”
Examples
-
”Edit this image and change the ring’s gemstone to green.”
-
”Put the ring on a white background instead.”
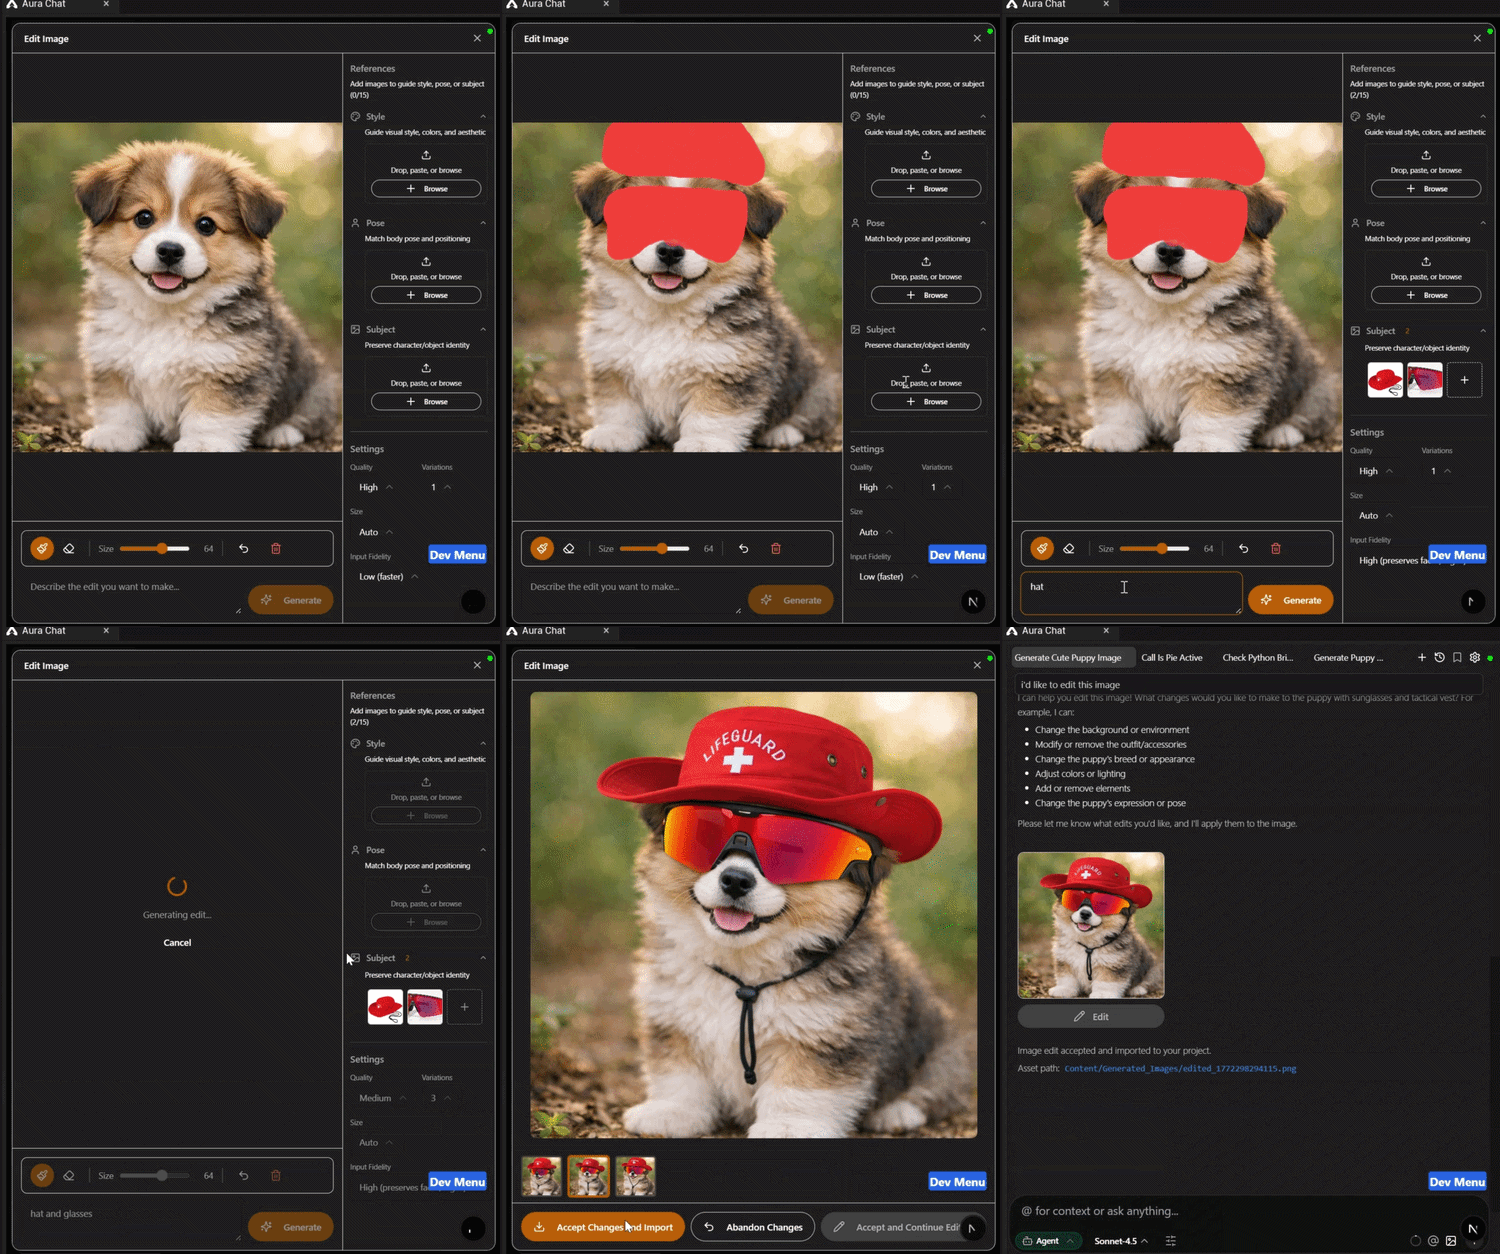
For more precise control, you can open any generated image in the image editing tool — a dedicated modal for in-painting and reference-guided edits.
To use it, press the Edit button below generated images in a thread. To edit an existing image, add it to chat context and prompt Aura to edit the image. It should show up in the thread with the Edit button below it.
In-Painting Canvas
In-painting allows you to use a painting canvas with a brush-based interface to mask specific areas of the image for targeted edits. The model attempts to preserve details outside the masked area.
To use it:
-
Use the brush to paint a mask over the area you want to change.
-
Type a prompt describing what should fill the masked area and hit send.
-
Preview the result, then click Accept to save it to your chat thread — or paint a new mask and try again.
Reference Panel
The Image Edit Tool has a reference panel on the side where you can load an image to guide the Style, Pose, or Subject of your edit.
-
Paste image data directly to the active reference panel indicated by the blue outline.
-
@-mention a texture from the Unreal Content Browser, or drag one in (in-editor Aura only) — it will automatically route to the active reference panel indicated by the blue outline.
-
Or click the upload button in the reference panel to pick a local file.
-
Or pick one from the Generated / Art Direction tabs below the panel (see below).
You can hold up to 5 references per category and 15 in total. References can be dragged between categories, and individual images are capped at 20 MB.
Generated tab
The sidebar's Generated tab lists the images Aura has already made for this project — everything in {ProjectFolder}/Saved/generated_images, including un-imported ones — so you can reuse a previous generation as a reference without saving it out and re-uploading it.
-
Type in the filter box to narrow the grid by filename.
-
Click a thumbnail, then choose Style, Pose, or Subject to add it. Added images are marked so you can see what you've already used.
-
The newest 300 images are listed, and 100 are shown at a time — narrow the filter to reach older ones.
This tab is always available and needs no setup. It refreshes as new images arrive, so images generated in chat while the edit modal is minimized show up when you come back to it.
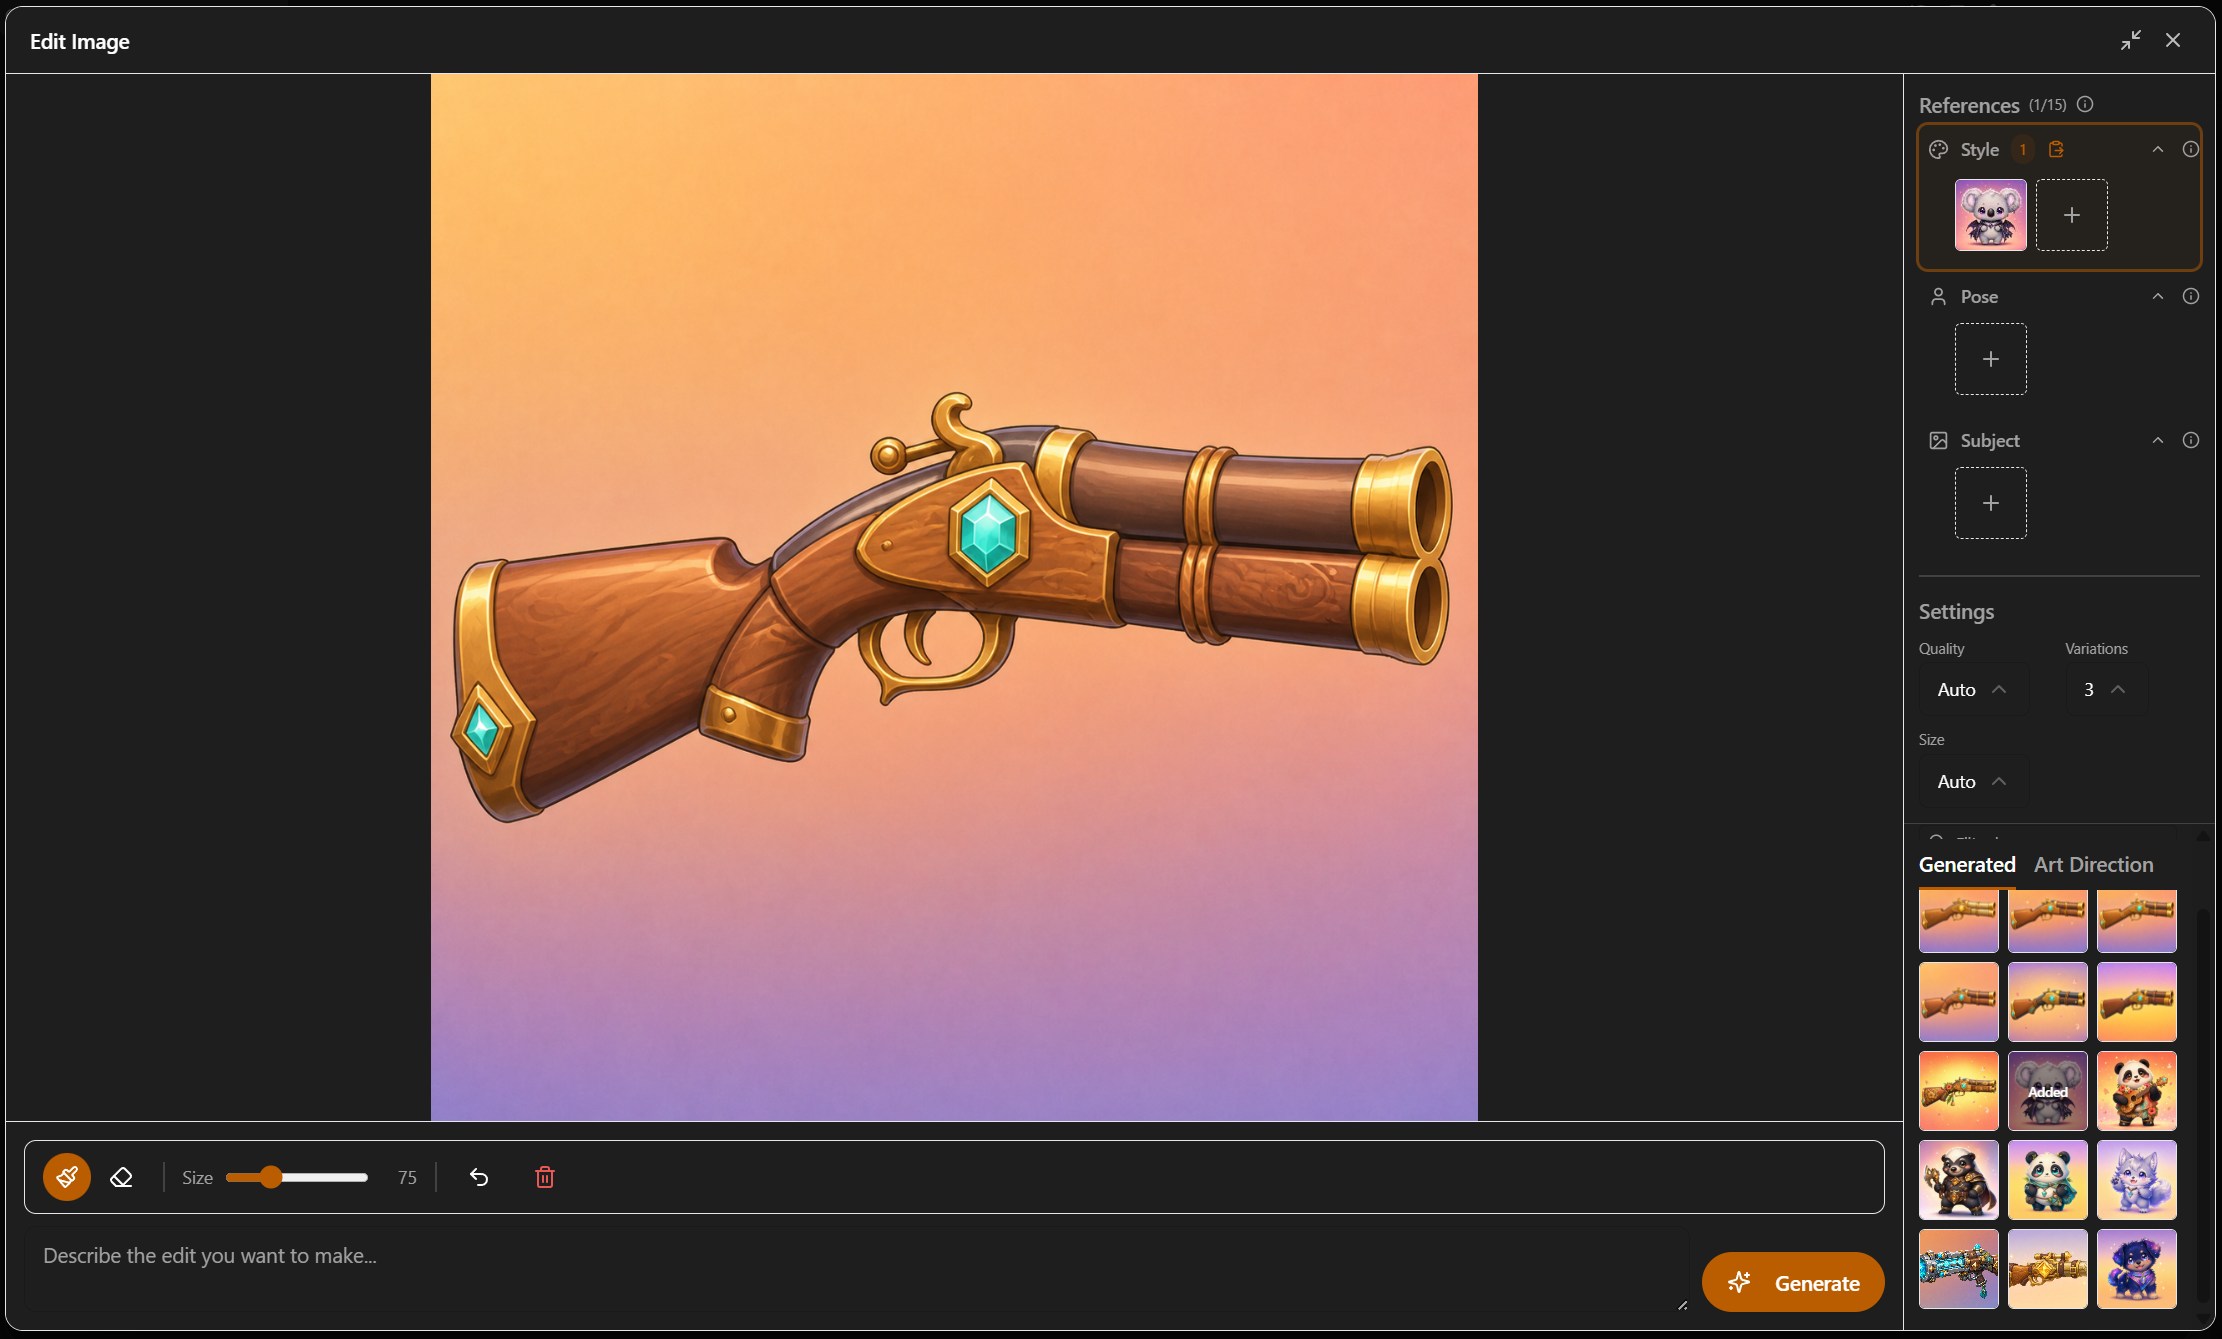
Art Direction tab
When Art Direction is enabled, a second tab appears next to Generated showing your reference library — the folders of concept art, mood boards, and style sheets you've pointed Aura at.
-
Filter by filename or tag, so
knightfinds everything you tagged that way regardless of what the files are called. -
Click a thumbnail and choose Style, Pose, or Subject, exactly as on the Generated tab.
-
Images you've removed from the catalog never appear here.
If the tab is missing, Art Direction is switched off — see the section below. If it's empty, you haven't added any reference folders yet.
Art Direction
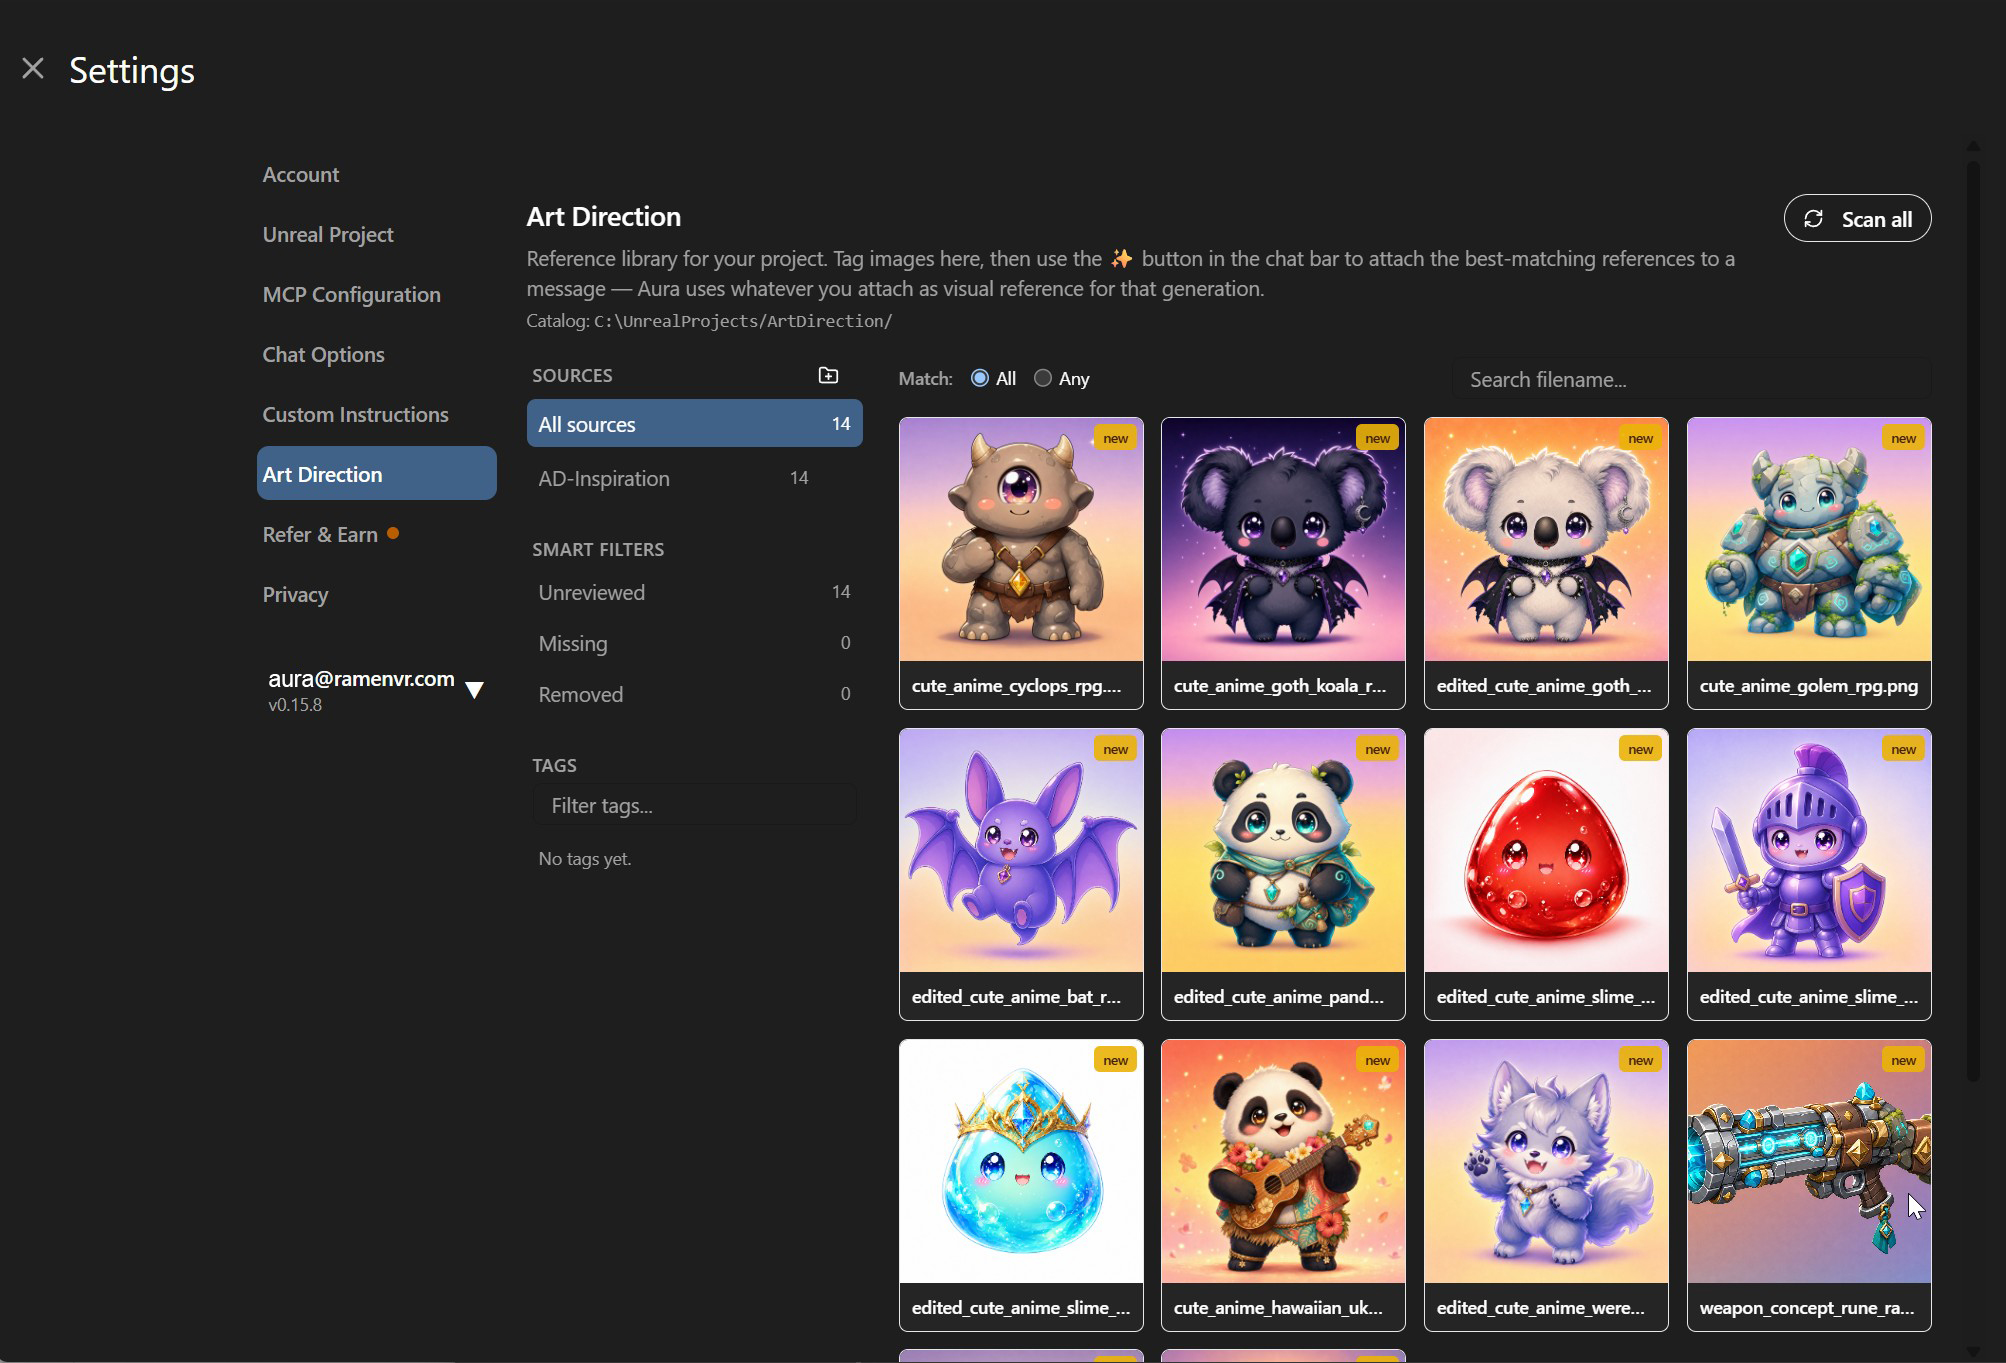
Art Direction is Aura's reference library. Point it at folders of concept art, mood boards, and style sheets you already have, tag them however you like, and Aura can pull the right references into a prompt automatically instead of you hunting for the file every time.
The catalog lives in {ProjectFolder}/ArtDirection/, so it travels with your project under source control. Aura only records paths and tags — your image files are never copied or moved.
Enabling Art Direction
Art Direction is off by default. To turn it on:
-
Open Settings → Chat Options.
-
Switch on Enable Art Direction.
Turning it on adds three things: a Settings → Art Direction page, the ✨ button in the chat bar, and the Art Direction tab in the Image Edit sidebar. Switching it back off hides all three — nothing is deleted, and your catalog is still there if you re-enable it.
💡 If the toggle isn't in Chat Options at all, your organization has disabled Art Direction account-wide.
Setting Up Reference Sources
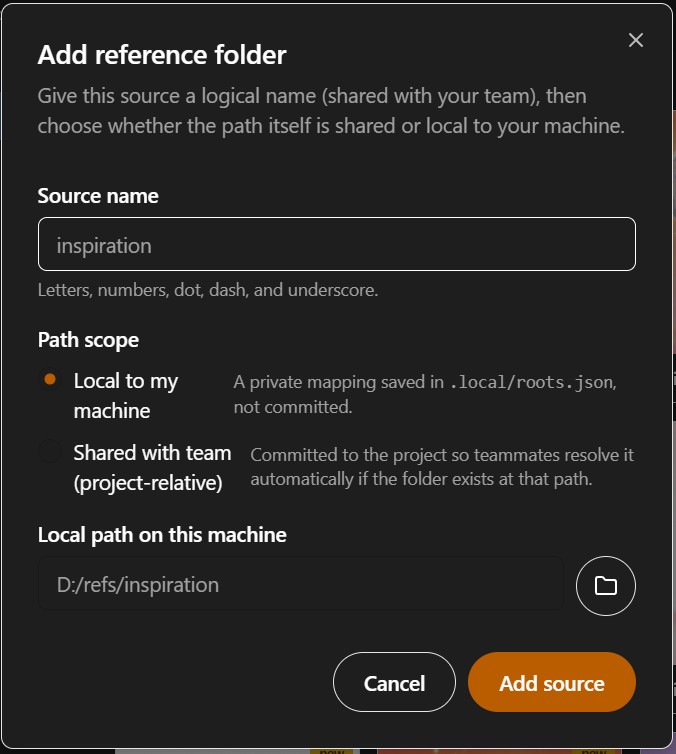
A source is a folder of reference images. Open Settings → Art Direction and click + in the Sources list (or Add your first reference folder on an empty catalog).
Each source needs a name — letters, numbers, dots, dashes, and underscores — and a path scope:
-
Local to my machine — an absolute path like
D:/refs/inspiration. The mapping is private to you and isn't committed. Use this for a personal reference stash that lives outside the project. -
Shared with team (project-relative) — a path relative to your project root, like
Content/ArtReferences. This one is committed, so teammates resolve the same folder automatically as long as it exists at that path. No leading slash and no..segments.
In the desktop app and in-editor, the folder icon opens a native picker so you don't have to type the path.
Scanning. Use Scan all (or Scan source when one is selected) to index new files. Aura reports how many were added. Supported formats are .png, .jpg, .jpeg, .tif, .tiff, and .bmp.
⚠️
.webpis deliberately not indexed — Unreal can't decode it, so those references couldn't be attached to a message anyway.
Missing sources. If a teammate committed a shared source you don't have, or you moved a local folder, it's flagged as missing. Click Resolve to point it at the right folder on your machine — that mapping is local to you and isn't committed.
Tagging
Tags are yours to define — there's no automatic tagger. They're what the ✨ button matches your prompt against, so it's worth tagging in the words you'd naturally type ("knight", "rocky terrain", "hand painted").
Tags allow letters, numbers, spaces, dots, underscores, dashes, and forward slashes.
To tag images:
-
Click images in the grid to select them. Shift-click to select a range.
-
In the bar that appears, click Add tags (or Remove tags).
-
Type a tag, or click one of the suggestion chips — these are ranked by how often you already use them, so your vocabulary stays consistent instead of drifting into near-duplicates.
-
Click Apply.
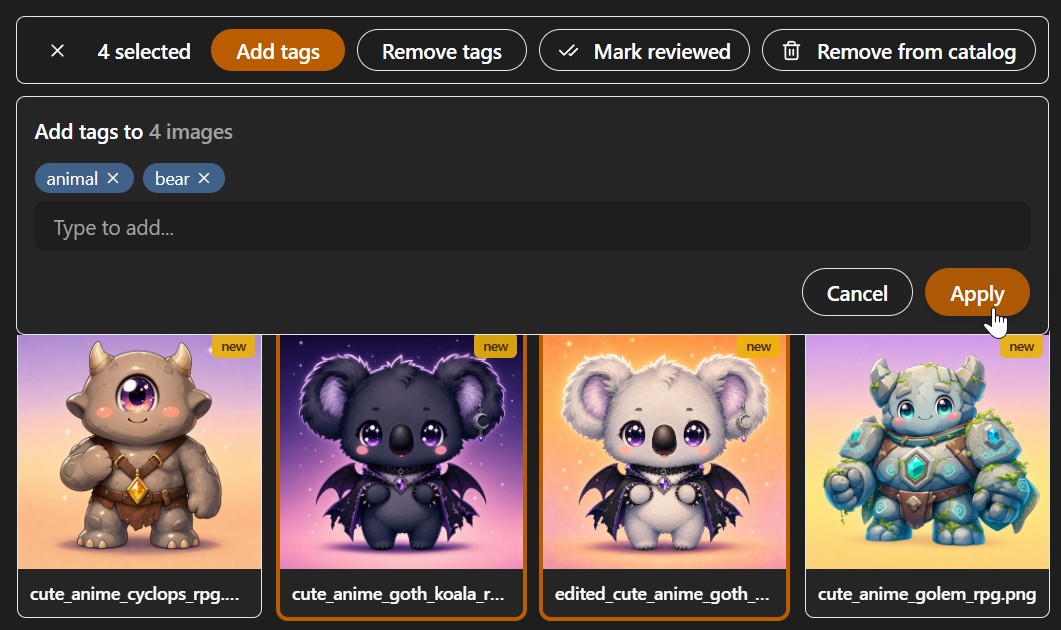
Images you haven't tagged or reviewed yet carry a yellow new badge in the grid — the same set the Unreviewed filter shows.
Managing your vocabulary. The Tags sidebar lists every tag with a usage count. Click one to filter to it, Ctrl/Cmd-click to filter it out, or use its menu to Rename or Delete it across the whole catalog.
Finding images. Combine the tag filters with Match All / Any, a filename search, and three smart filters:
-
Unreviewed — images you haven't tagged or marked reviewed yet. Use Mark reviewed on a selection to clear images that genuinely need no tags.
-
Missing — records whose file is no longer on disk.
-
Removed — images you've taken out of the collection.
Removing an image. Remove from catalog takes an image out of the collection so it's never suggested again. The file on disk is untouched, a rescan won't quietly re-add it, and you can Restore it later from the Removed filter.
Adding Images as References
There are four ways an image can end up guiding a generation:
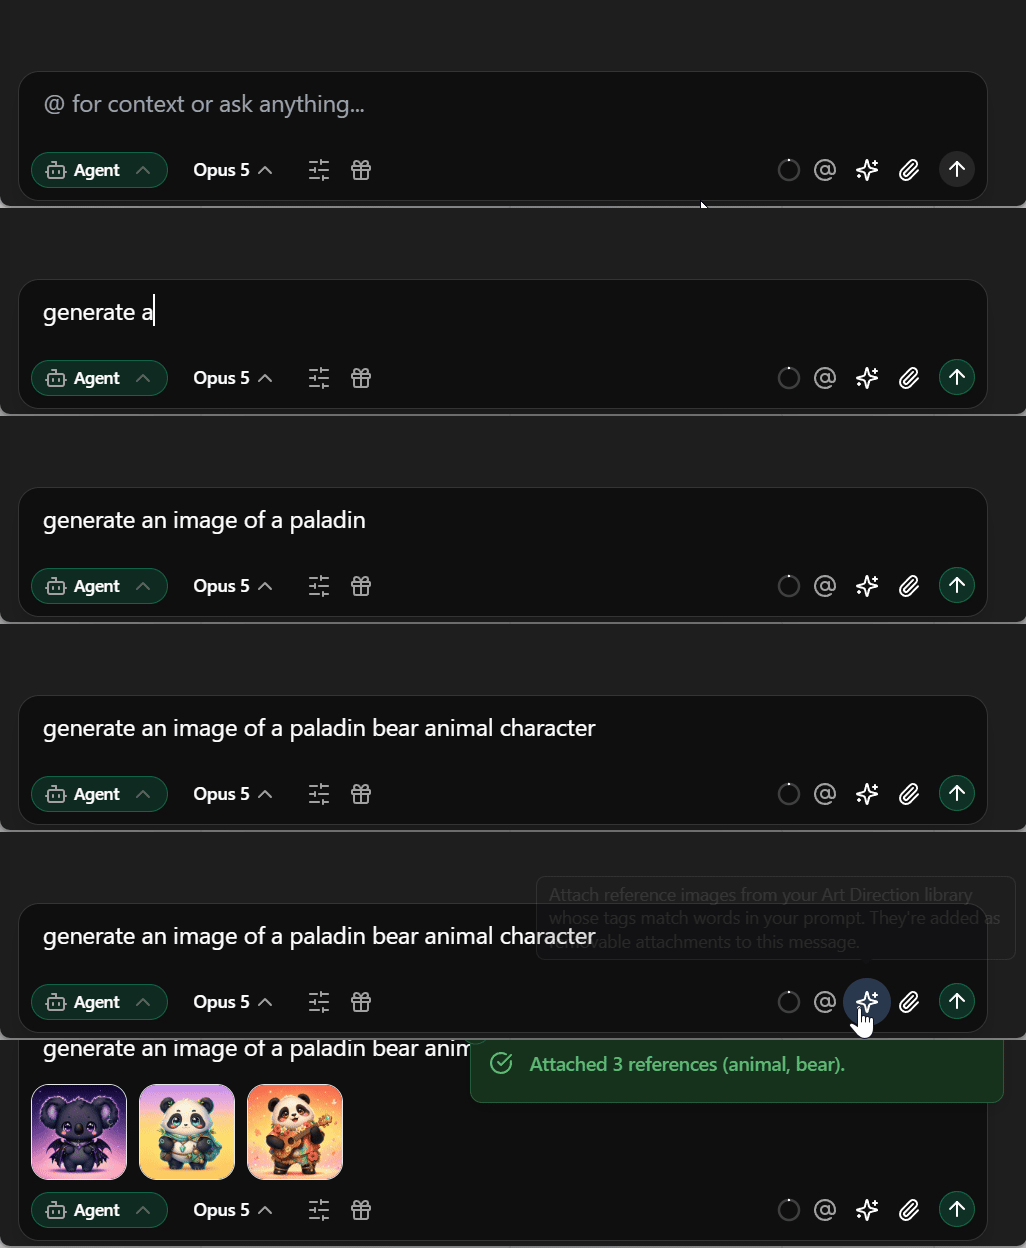
1. The ✨ button in the chat bar. Type your prompt first, then click ✨. Aura matches the words in your draft against your tag vocabulary and attaches up to 3 of the best-matching references as chips you can remove individually. Images carrying more of the matched tags rank higher. If nothing matches, Aura tells you which tags it found (or that your catalog is still empty) rather than attaching something random.
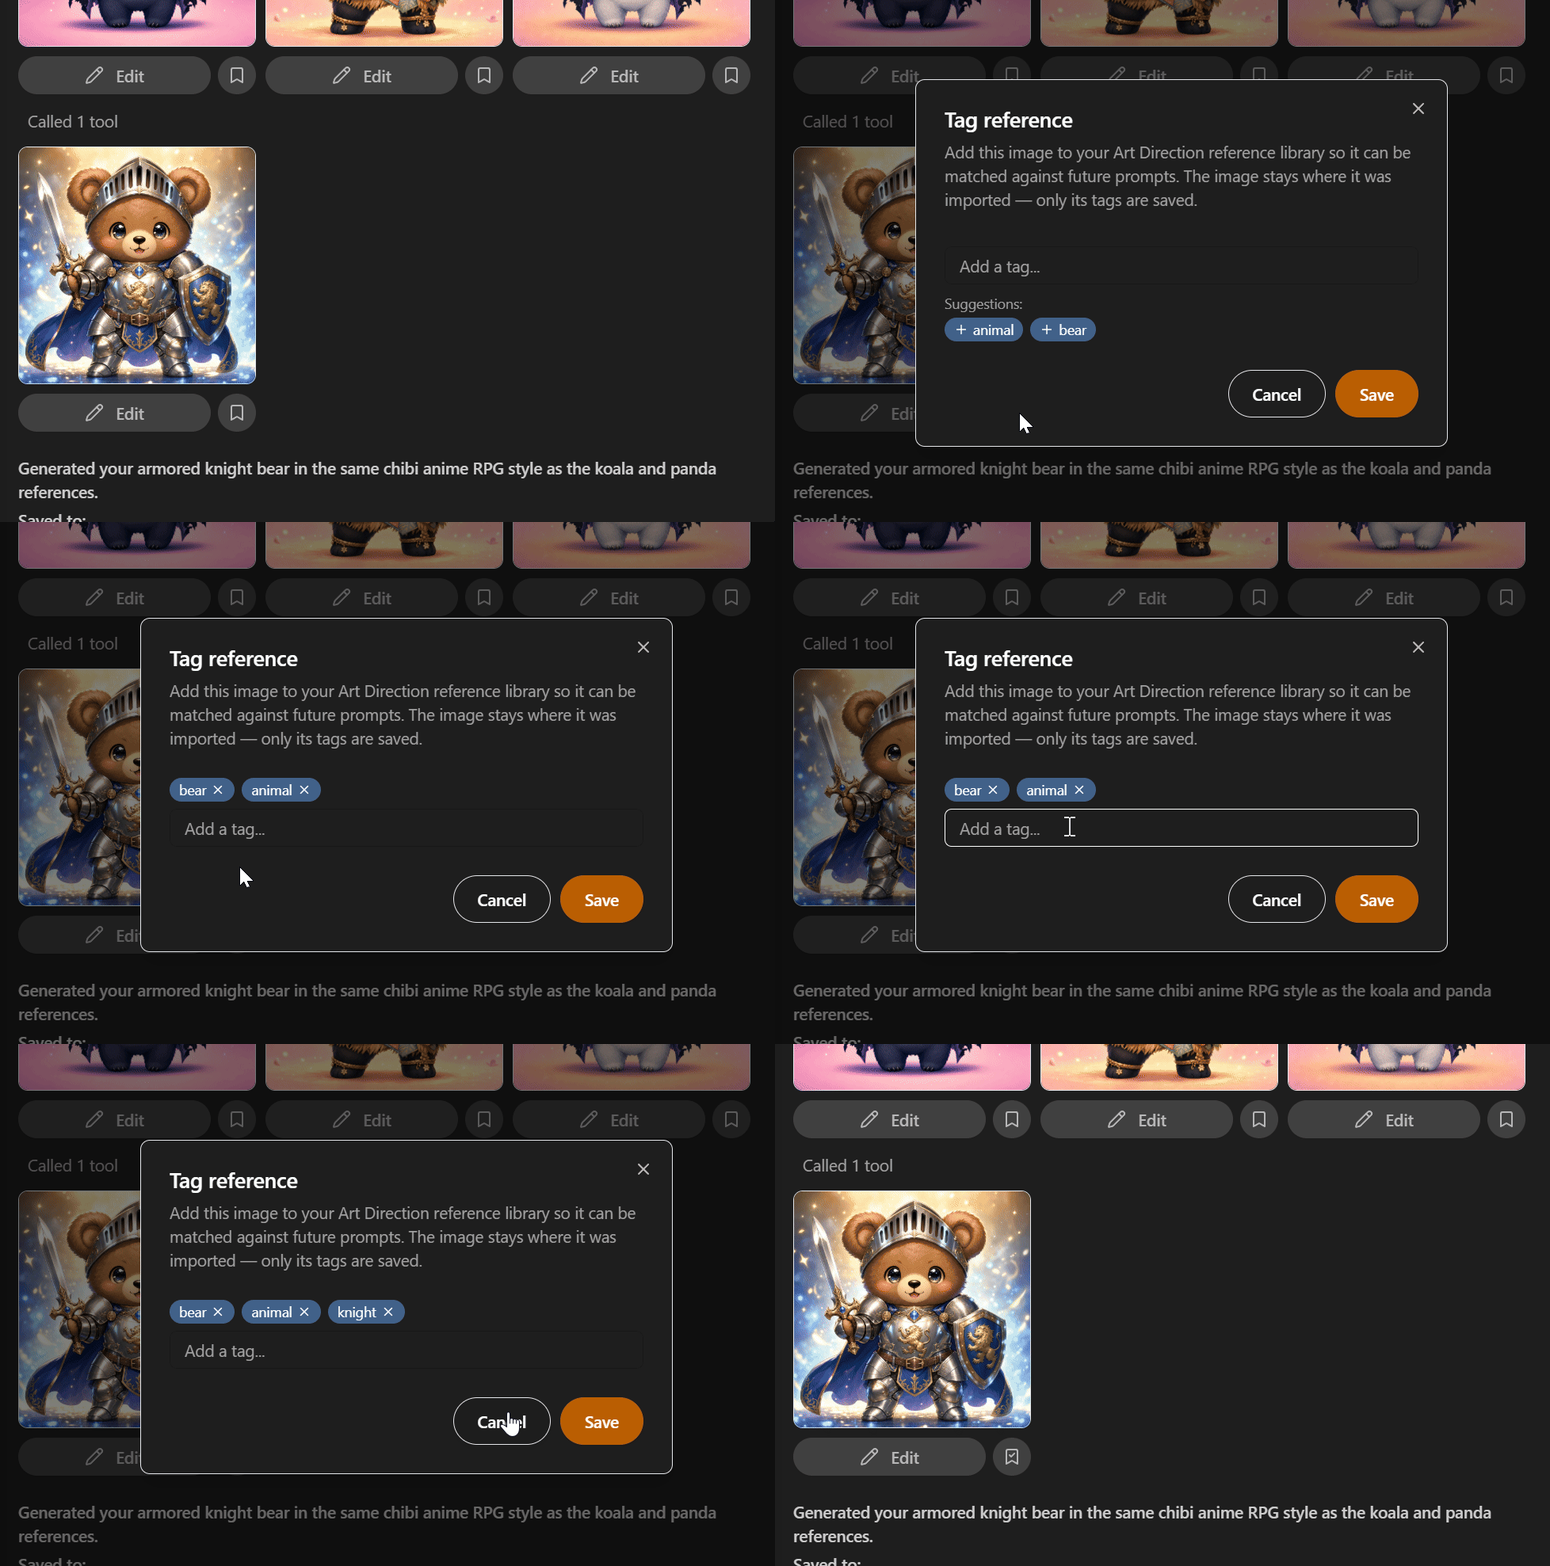
2. Bookmarking from chat. Any generated image you've Imported gets a bookmark button. Click it, add tags, and save — the image joins your catalog at its imported location. Nothing is copied; Aura just starts tracking it. The first bookmark creates a generated-images source for Aura's default import folder automatically.
3. The Art Direction tab in the Image Edit Tool. Browse the catalog, filter by name or tag, and click a thumbnail to add it as a Style, Pose, or Subject reference for an in-painting or reference-guided edit.
4. As chat context. References are also just images — you can still @-mention, drag, or paste one into chat the usual way when you want a one-off that doesn't belong in the library.
💡 The ✨ button is only as good as your tags. A dozen well-tagged hero images beat a thousand untagged ones, so tag as you go rather than in one big pass.
Model Generation
Aura can create 3D models based on text prompts and reference images.
It may take a few minutes depending on current request traffic and complexity of the request. Once complete, the model is conveniently added to your current level for viewing.
- By default, generated models are game-ready meshes with up to 20,000 triangles. Ask for “high quality” or “V3” to switch to the high-detail model, which targets around 50,000 triangles. Asking for “maximum quality” lets the model pick its own triangle count, up to Tripo’s ceiling of roughly 1.5 million. You can also set an exact count in your prompt, e.g. “face_limit=1000”.
⚠️ Higher triangle counts take noticeably longer to generate and import.
💡 Model generation is intended for prototyping and visual exploration. Assets may not be production-ready.
Examples
-
“Generate a model of a magical wooden staff with a red crystal at the top.”
-
After giving Aura the reference image, or right-clicking in content browser, “Generate a model based on this image”
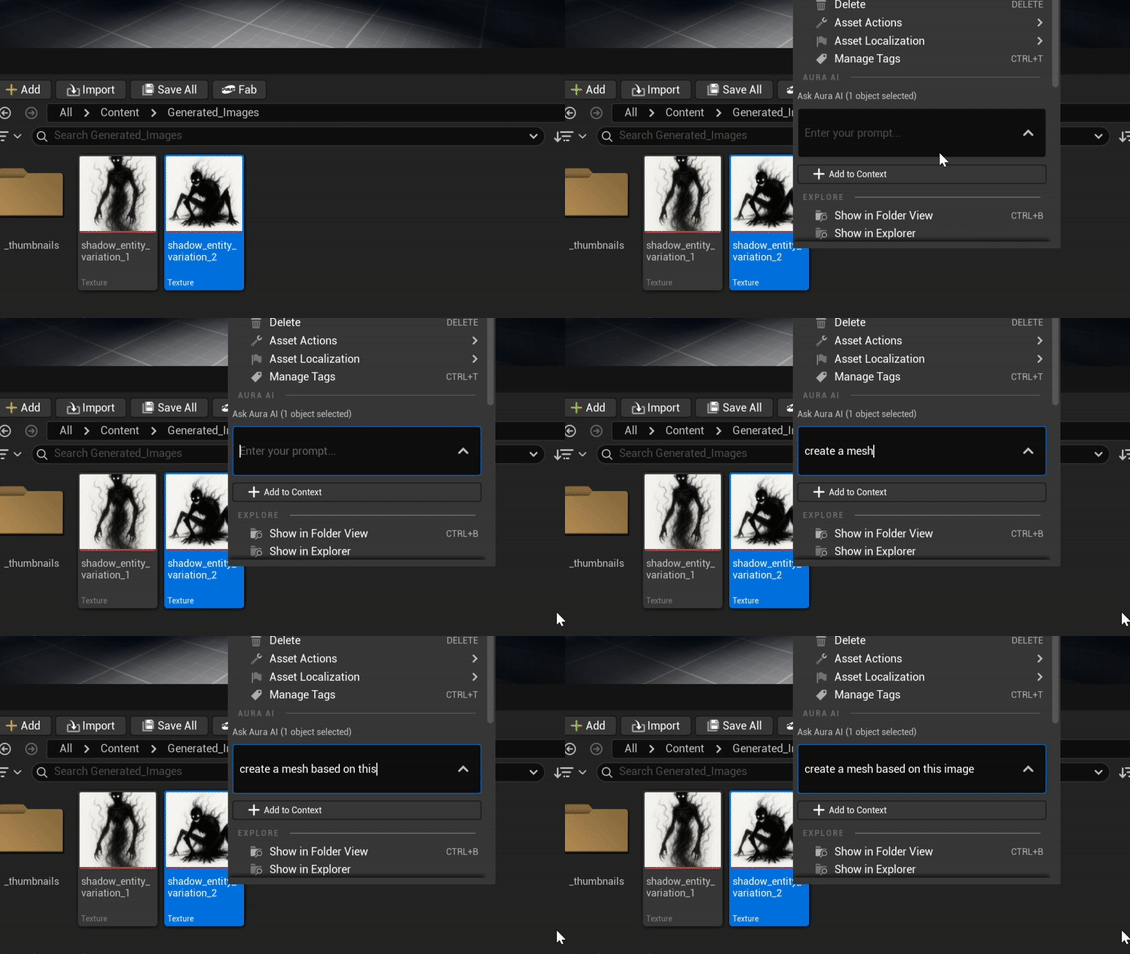
Models are saved in /Game/AuraModelGen/{ModelName}/.
You can customize the save folder in Editor Preferences Advanced Settings.
Textures and Materials
-
Textures come in three tiers: standard (the default), 4K (ask for “4K” or “HD textures”) and 8K (ask for “8K textures”). Higher tiers use more credits. 8K models import as GLB so the full texture resolution is kept.
-
Ask for an “untextured” or “geometry only” model to get the bare mesh with no textures. This is useful for blockouts.
-
PBR materials (base color, metallic, roughness, normal) are off by default. Ask for “PBR materials” to include them. Requesting PBR always turns textures on, so it can’t be combined with an untextured request.
Examples
-
“Generate an untextured model of a stone well.”
-
“Generate a model of a worn leather satchel with HD textures.”
-
“Generate a model of a brass lantern with 8K textures.”
-
“Generate a model of a brass lantern with PBR materials.”
Multiview Models
Attach 2 to 4 photos of the same object and Aura builds one model from all of them, at the same price as a single image. One photo must be a front view; Aura works out which side each of the others shows (left, back or right). Multiview models keep the details your photos show on every side, instead of guessing at the sides a single image can't see.
- “Generate one model from these photos of my chair.”
Upgrading Textures to 4K or 8K
You can upgrade the textures of a model Aura already made without regenerating its geometry. The result imports as a new copy named <Name>_4K or <Name>_8K in your Aura model folder; the original is left untouched.
- “Upgrade the textures on /Game/AuraModelGen/Chair/Chair to 8K.”
Limits: only models generated with Aura (not V2.5), not rigged (skeletal) meshes, and 8K is the maximum. For single-image models, sides the photo didn't show are repainted and may differ slightly from the original.
Forcing a Model Version
Aura picks the game-ready model automatically and only switches to the high-detail model when you ask for it. To override this for every generation, go to Settings > Chat Options > Force 3D Model Version, turn it on, and choose v2.5, v3, or P1 (game-ready).
Workflow Tips
-
Using a reference image will lead to better results. Reference images are also the best way to get a consistent style across models.
-
For multiview models, use orthographic views of the object alone, rendered against a solid-color background with nothing else in frame. Make sure each view matches the side it's meant to show. If you don't have these views, Aura can generate them for you from one image or a description.
-
You can specify scale in your prompt, “Generate a model of a wooden staff that’s 1.5 meters tall”
-
You can also specify pivot location to be at the center or bottom of the model. By default it will almost always set the pivot to the bottom.
UV Cleanup & Retexturing
A mesh's UV layout decides how textures sit on its surface, and the layout a mesh ships with isn't always the one you want for the work ahead — whether it was generated, scanned, or brought in from elsewhere. Aura can give a Static Mesh a fresh unwrap and carry its existing textures across onto the new layout, so you can take a model further without re-texturing it by hand.
The work is split across three kinds of tool, and Aura will normally run the whole sequence for you rather than asking you to drive them one at a time:
-
AutoUV — generate a fresh UV layout for a Static Mesh.
-
UV check — a read-only inspection that reports on a layout's condition.
-
Texture baking — reproject a mesh's existing textures onto its new layout.
Cleaning Up a Mesh
This is the end-to-end path, and usually all you need to ask for.
Examples
-
"Clean up the UVs on this rock and re-bake its textures."
-
"The textures look stretched on this model — redo the UVs and reproject."
Aura will unwrap the mesh onto its main UV channel while preserving the original layout into a new channel, so any existing channel such as a lightmap is left alone. It then checks the result and retries with progressively more aggressive unwrap settings until no UV triangles overlap, switching to the XAtlas method on the final attempt, which splits islands to guarantee a clean layout. Once the UVs are clean it bakes the mesh's existing textures through the preserved layout onto the new one — base color, normal, roughness, and metallic, whichever the mesh had — then builds a material from the baked textures and assigns it to the mesh.
If the layout still won't come out clean after several attempts, Aura stops and asks you how to proceed rather than baking onto a layout it isn't happy with: accept the layout as-is, fix it by hand in the editor and tell Aura to re-check, or stop there.
Checking a UV Layout
The UV check is read-only — nothing is unwrapped, baked, or saved — so it's a safe way to find out whether a mesh is ready for baking or lightmapping, or to explain why a bake came out wrong.
It reports three defects on the channel you ask about:
-
Overlapping UVs — triangles whose 2D footprints genuinely overlap, so a texture or lightmap gets sampled onto more than one surface. Islands that merely touch along an edge aren't counted.
-
Bow-ties — a pinch in UV space that breaks bakes and repacking.
-
Degenerate triangles — zero-area UV triangles.
Examples
-
"Check the UVs on this mesh."
-
"Is this model ready to lightmap?"
Unwrapping on Its Own
You can also just ask for a new UV layout without the bake, and target a specific UV channel. PatchBuilder is the default and matches the editor's own AutoUV; XAtlas is the fallback that guarantees no overlaps, at the cost of more seams.
Examples
-
"Give this mesh a fresh UV unwrap."
-
"Redo the UVs using XAtlas."
Reprojecting Textures on Their Own
If a mesh has already been re-unwrapped, its existing textures can be reprojected onto the new layout as a standalone step, without running the full cleanup again. Each map is reprojected into its own texture, so base color, roughness, and metallic stay separate rather than being flattened together.
The mesh needs a valid UV layout before anything can be baked onto it, so this follows an unwrap rather than replacing one.
Examples
-
"Reproject this mesh's textures onto its new UV layout."
-
"Re-bake the base color and roughness onto the cleaned-up UVs."
Character Rigging

Aura can generate rigged character models (SkeletalMesh with a skeleton) directly from text or image prompts. Just include "rigged" in your prompt.
- "Generate a rigged humanoid character"
Characters default to an A-pose (palms facing inward), which is optimal for Unreal's mannequin skeleton. You can also request a T-pose.
You can also rig an existing StaticMesh by giving it as context and asking "Rig this model". Static meshes must be character biped assets. Rigged models are saved as SkeletalMesh assets in the same location as regular model generations. This feature is only available in Agent mode.
💡 For best rigging results, generate an orthographic front view image of a character in an A-pose first, then ask Aura to generate a rigged model of that image.
Animation Retargeting
Aura can replace characters in your game with different skeletal meshes while preserving all existing animations. Aura handles the full pipeline automatically: creating IK rigs, retargeters, aligning forward direction, and batch-converting animation assets.
- "Replace the player character with my custom skeletal mesh"
This feature has been optimized for replacing UE Mannequin-based character setups like the UE ThirdPerson template project. This feature is only available in Agent mode.
Character Motion
Character Motion is Aura's text-to-motion tool. Describe a movement in chat and Aura generates a humanoid animation clip for it, either on a character you attach or on the UE5 Mannequin. Character Motion is available on paid plans.
How to Use It
-
To animate your own character, add its Skeletal Mesh, Skeleton, or Animation Blueprint to chat context (see Giving Aura Context). With nothing attached, Aura animates the UE5 Mannequin.
-
Describe the motion. You can also give a length (up to 10 seconds), pick a model version, and ask for a looping clip.
-
Follow progress in the chat card. Each clip has its own row with a progress bar, model, and duration, so you can ask for several clips in one message.
-
When a clip is ready, click Import to add it to your project as an Animation Sequence, or Keep file only. You can also just answer Aura in chat.
Examples
-
“Generate a 3 second idle for this character, looping in place.”
-
“Make a run cycle for the mannequin with root motion and import it.”
-
“Use v3 to animate a boxer in orthodox guard: 1) left jab, 2) left jab, 3) right straight, 4) returns to guard.”
Every clip is saved to {ProjectFolder}/Saved/AuraMotionGen_Downloads/, whether or not you import it. Imported clips go to /Game/Generated_Motion/ by default.
By default, Aura asks before importing a clip. To skip the question, say "and import it" in your request, or turn on Import Generated Motion Automatically in Editor Preferences > Aura > File Settings. You can change the Motion Generation Output Directory there too.
Walk cycles, runs, and idles can be generated as seamless loops, either in place or with root motion, at no extra cost. Only cyclic motion loops well, so don't ask for a looping combo or one-off action.
⚠️ Once a clip is submitted for generation, it can't be cancelled and is still charged. Stopping the chat before submission costs nothing. If you stop it after submission, the clip still finishes and Aura asks later whether to import it or keep the file.
Choosing a Model: v2.0 and v3.0
Aura uses v2.0 unless you ask for v3.0, for example “use v3”.
v2.0 (default)
-
Generates in seconds, costs less, and works at any length up to 10 seconds.
-
Performs about one featured move per clip. Later moves are usually dropped and the remaining time becomes idle, so a longer clip only adds idle.
-
Less consistent. Very similar prompts can give very different results, and the feet can drift even when you ask them to stay planted.
-
Best for single actions, locomotion cycles, quick drafts, and testing prompt wording.
v3.0
-
Costs about 3x v2.0 per second of animation. Clips are 4 to 10 whole seconds long, so short requests cost proportionally more.
-
Takes 2 to 4.5 minutes, or up to about 10 when a job has to be retried. Jobs that fail to start are retried automatically at no charge.
-
Chains several moves in order (combos, routines) and keeps the feet planted in held poses. Small changes to the prompt give small, predictable changes in the result.
-
It isn't an upgrade for locomotion. v2.0 had less foot sliding on a walk.
-
Best for multi-move sequences and final passes on a pose.
When you ask for two or more moves, Aura offers either one v3.0 clip for the whole sequence or one v2.0 clip per move.
💡 Draft in v2.0 to find wording that works, then switch to v3.0 to fine-tune the pose. In v2.0 a single word can change the whole action, so fine adjustments only stick in v3.0.
Prompting Tips
-
Describe the body, not the character. Leave out appearance, costume, and mood, and start with a neutral subject like "A person…". Role words act as motion presets, so only use them when you want that style. "Fighter" or "ready stance" gives a boxing guard even if the rest of the prompt describes a relaxed pose.
-
Watch for words that trigger a whole action. Exercise and action words like "squat" or "fists" can turn a held pose into repetitions or a combat stance. If a clip has large repeated movement, check the prompt for one of these words first.
-
Use body measurements, not adjectives. "Feet about twice shoulder width apart" and "hands at hip height" are followed more closely than "wide" or "low". Fractions like "halfway down" work well for how far a joint bends.
-
Keep a consistent structure. Open with the stance ("A person stands still in a…"), then describe the legs, torso and head, and arms and hands, ending with one line of idle motion like "slow breathing". Ask for symmetry explicitly ("both hands level with each other"). For a sequence, list the moves in order and allow about 1 second per strike or gesture, plus a second to set and finish.
Limitations
-
Text only. Character Motion can't use images or videos as reference. Attaching an image of a pose won't influence the result, so describe the pose in words.
-
Body motion only. The character can't hold props or weapons. To keep the hands in a holding position, describe an imaginary object and say where it is, e.g. "as if holding a long horizontal bar across the front of the thighs".
-
Humanoid characters only. Clips are humanoid animations, so a custom character needs a humanoid skeleton.
-
Large characters fall back to the Mannequin. If your character can't be uploaded (for example, it's over about 2.8 MB once exported), Aura generates the clip on the UE5 Mannequin and retargets it to your character with Animation Retargeting. You aren't charged twice.
-
Length limits. Clips are at most 10 seconds (4 to 10 for v3.0), and prompts are capped at 1,024 characters.
Material Agent
Material creation and editing has moved to its own page — see Material Agent.
Additional Settings
How to Change Save Locations
-
In Unreal go to Edit > Editor Preferences
-
Scroll down to Aura > File Settings
-
From here you can change the default folder for Image and Mesh Generations.